
Sign an APK using Jarsigner
Recently, I was working on visual regression testing for an Android application. In other words, I was working on testing an app on a range of different devices to make sure the design displayed and functioned correctly on devices with different screen sizes, orientations, and on devices using different versions of Android. Here’s the process I was using to perform the tests:
- Create a test with Espresso test recorder in Android Studio
- Create a signed debug APK
- Upload both the app APK and the Espresso test APK to a testing service (I was testing on Google Firebase and App Center)
- Wait for the automated Espresso test to run and review the results
However, I ran into an issue with that last step. On both Firebase and App Center, I encountered an issue in which the app APK was signed, but the Espresso test APK was not signed. Therefore, security features in Android prevented the app and test from running.

This is the error I received while trying to run the test in App Center. The test would not run because the test APK was not signed.
I tried a whole bunch of methods to get the APK created by Android when the Espresso test runs to sign. I tried changing various things in build.gradle, I tried in various build variants, I poked around in module settings, and I never got the APK to sign. I don’t doubt there is a way to make Android Studio sign the test APK, I just ran out of time to figure it out.
Instead, I found a different solution:
- Create a test with Espresso test recorder in Android Studio
- Manually sign the test APK using jarsigner
- Create a signed debug APK
- Upload both the app APK and the Espresso test APK to a testing service
- Wait for the automated Espresso test to run and review the results
That second step is the subject of this post. It is possible to create an unsigned APK first, and then sign it manually using a tool built into the Java JDK called jarsigner.
1. Install the Java JDK
The jarsigner tool we will be using the sign the test APK is part of the Java Development Kit (JDK). So, in case you haven’t already installed the software, that will be the first step. Simply head over to Oracle’s website and download the latest version of the JDK.

After downloading the JDK, just install it as you would any other program.
2. Update your System’s PATH Variables
Now that you’ve installed the JDK, you will have the jarsigner tool on your system inside the Java installation directory. This is typically something like C:\Program Files\Java\jdk-13.0.2\bin. In order to use the jarsigner tool, we will need to run some commands in the Windows Command Prompt. But there is one issue we need to solve first. As of now, you will only be able to run the jarsigner command if you run the command from within the Java installation directory. This is an issue because that is not where your APKs are stored*.
In order for your system to run the jarsigner command from the folder where your APK is stored, we will need to update the Windows PATH variable. The PATH variable is part of a set of environment variables that Windows uses to determine how to run processes. To do this, start by searching for “environment variables” in the Windows Start menu. Then, select Edit the system environment variables.

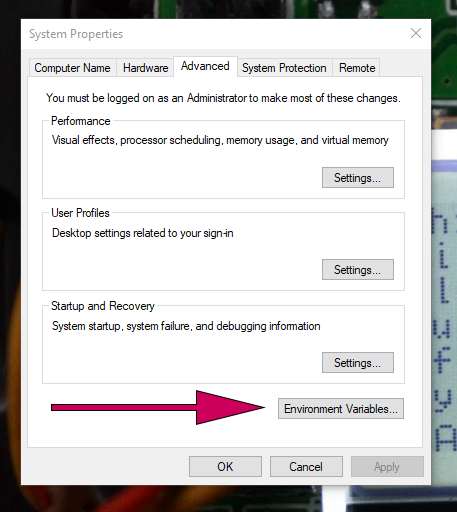
Then, from the System Properties dialog box, click the Environment Variables… button at the bottom of the dialog.
In the Environment Variables dialog box, there will be several variables listed. In this case we are interested in the ones called Path. First, select the Path variable under the User variables for ______ section. With that variable selected, press the Edit button.

In the Edit environment variable dialog box, press the New button. Then, enter the path for the bin directory inside your Java installation directory. It should be something like C:\Program Files\Java\jdk-13.0.2\bin.

After adding the Java bin directory (which is where the jarsigner tool lives) for the User variables for ______ section, do exactly the same thing for the Path variable under the System variables section.
After doing this, you will need to restart your computer to make the change to environment variables stick. I know that is a little annoying when you are in the middle of this tutorial so, just click the button below to send the URL for this post to yourself. This way, after your computer boots back up, you can come back here.
3. Sign your test APK
Welcome back. Now that we have all the setup done for using the jarsigner tool, we can get to work signing your test APK. First of all, navigate to the directory where your test APK is stored. From inside your app’s directory, this is typically found in <app directory>app\build\outputs\apk\androidTest\debug.

Then, keep that window open and launch the Window Command Prompt by searching “cmd” in the start menu. Choose the option to Run as administrator which should appear in the start menu or it can be chosen by right clicking on the Command Prompt icon.

Next we need to navigate to the location of your test APK in the command prompt. First, copy the path for the location where your test APK is stored. Then, in the Command Prompt, enter cd <path to test APK>.

And now for the good part. To sign your currently unsigned APK, we will use this command:
jarsigner -verbose -sigalg SHA1withRSA -digestalg SHA1 -keystore my-release-key.jks
my-application.apk alias_name
In this command, the “my-release-key.jks” is the path to the keystore you used to sign your app. Note that, in order to be accepted by Android security requirements, you must sign your test APK with the same key that you used to sign the app you are testing. The my-application.apk is simply the name of your test APK. Since Command Promp is already in the directory where your test APK is stored, this does not need to be a path, just a file name (typically something like app-debug.androidTest.apk. Last, alias_name is the name of the key you are using in your keystore. So, for example, your command might look something like this,
jarsigner -verbose -sigalg SHA1withRSA -digestalg SHA1 -keystore C:\Users\user1\Documents\Android\Keystore\key1.jks app-release-androidTest.apk key1

As you can see, after entering the command, you will be prompted for the password to your keystore. So just enter that. Note that Command Promp will hide your input for the password. Upon pressing Enter, you should be greeted with a confirmation that your jar (APK) was signed. Yay!

If you want, you can verify that the APK was successfully signed using the command jarsigner -verify app-name.apk.
